Ultra-high vacuum sample grabbing method
Time: 2020.07.30Source: View: 4595
In ultra-high vacuum equipment, it is very difficult to obtain a vacuum environment (baking, degassing, etc. are required), so the vacuum cannot be easily broken to expose the atmosphere. However, actual testing often requires the replacement of different experimental samples, which requires users to be able to achieve in-situ sample grabbing and release in an ultra-high vacuum environment. In this issue of the official account, let's take a look at the sample grabbing device in an ultra-high vacuum environment.
First of all, sample grabbing is closely related to the design of the sample holder. In the early vacuum systems, there were various sample holder designs and sample transfer methods. With the advancement of technology and the need for vacuum interconnection, various manufacturers are gradually standardizing the design of sample holders to maximize the compatibility and scalability of the system. This introduction mainly focuses on the most widely used sample holder in the field of surface analysis: Flag Type Sample Holder (Chinese name: Flag Type Sample Holder). The dimensions of the simplest type of Flag Type Sample Holder are as follows:

However, in actual use, this sample holder has many variants, such as additional electrodes, double layers, steps, etc. Generally, the sample carrying end (the upper thin sheet) will be changed, and the lower half (grabbing part) will be retained. In addition, some manufacturers will also make some changes to the ear part, that is, there is no small hole in the middle. This design is currently used less and less, but users still need to pay attention.
For Flag Type Sample Holder, different gripping methods can be used. The following is an introduction to the different gripping heads of the Femian instrument.
1
TH100 rotating gripper head

(1) Grasping the sample tray:
① The notch of the grab head is parallel to the sample tray, so that the sample tray is fully inserted into the grab head.
② Rotate 90° clockwise.
③ Retract the grab head to complete the grab of the sample tray.
(2) Releasing the sample tray:
① Align the sample tray grasped by the grab head with the parking platform and insert it into the sample tray parking platform.
② Push the grab head to the bottom and rotate 90° counterclockwise.
③ Retract the grab head to release the sample tray.
Dimensions:
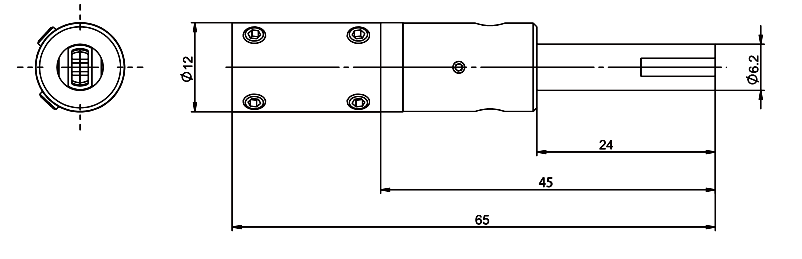
The advantages of the TH100 gripper head are simple operation, high cost performance, simple internal structure and long life. However, due to the high requirements for the rotation locking and loosening angles, it is easy to twist the ear of the sample holder and cause damage. In order to solve this problem, our engineers have developed the TH120 gripper head, which allows 360° rotation without damaging the ear.
2
TH120 rotating gripper head


(1) Grasping the sample tray:
① The notch of the grab head is parallel to the sample tray, so that the sample tray is fully inserted into the grab head.
② Rotate 90° at will.
③ Retract the grab head to complete the grab of the sample tray.
(2) Releasing the sample tray:
① Align the sample tray grasped by the grab head with the parking platform and insert it into the parking platform.
② Push the grab head to the bottom and rotate 90° at will.
③ Retract the grab head to release the sample tray.
Dimensions:

TH1xx series sample holders are relatively simple to operate, but when decoupling, the sample holder and the gripping head are required to be at a specific angle. This is OK for short-distance visible sample transfer, but for long-distance sample transfer, this angle is often difficult to grasp, and the sample holder may be accidentally brought out. For this situation, Fermion provided another solution, which is the TH200 gripping head.
3
TH200 loose top and tight gripping head

(1) Grasping the sample holder: ① The grasping head moves along the direction of the sample holder and enters the ear of the sample holder. ② The front end of the grasping head contacts the sample holder and continues to move to the bottom. The ejector pin enters the small hole of the sample holder and pushes the locking tongue open at the same time. ③ Retract the grasping head to ensure that the locking column is positioned in the locking tongue groove to complete the grasping of the sample holder. (2) Releasing the sample holder: ① The grasping head locks the sample holder and enters the sample holder parking platform in the direction of alignment. ② The grasping head continues to move to the bottom and pushes the locking tongue open. ③ Retract the grasping head to release the grasping head.
Dimensions:

TH200 gripping head can realize sample placement through unidirectional movement, which is more suitable for long-distance sample transfer without visual or tactile feeling, such as RDC 820.
The above Th1XX and TH200 series gripping heads are relatively simple to operate and suitable for most transfer scenarios, but the disadvantage of this type of transfer method is that it will force the sample to be transferred to the sample stage through the sample holder. Most devices can withstand this force, but if it is a precision sample stage driven by piezoelectric ceramics (such as STM), the above two methods are not applicable, and a more gentle transmission method is required.
4
TH600 claw opening and closing grabbing head

(1) Grasping the sample holder: ① Operate the dual-axis ultra-high vacuum manipulator to push the transmission inner shaft to open the claws. ② Push the grasping head to the bottom and release the transmission inner shaft. The claws close and grasp the sample holder. ③ Retract the sample transfer rod and remove the sample holder to complete the grasping of the sample holder. (2) Releasing the sample holder: ① Align the sample holder grasped by the grasping head with the parking platform and insert it into the parking platform. ② Operate the dual-axis ultra-high vacuum manipulator to push the transmission inner shaft to open the claws. ③ Retract the grasping head and release the transmission inner shaft to release the sample holder.
Dimensions:

TH600 completely relies on its own operation to achieve sample placement, thus completely avoiding external stress on the sample stage, and is very suitable for sample transfer on the Piezo stage.
5
The following are the types of sample transfer devices that can be used with the grabber head
| Grab head type | Compatible sample transfer device types |
| TH100 | Small magnetic coupling sample transfer rod (MTA16 series), magnetic coupling sample transfer rod (MTA35 series), ultra-high vacuum manipulator (WS series), etc. |
| TH120 | Small magnetic coupling sample transfer rod (MTA16 series), magnetic coupling sample transfer rod (MTA35 series), ultra-high vacuum manipulator (WS series), etc. |
| TH200 | Magnetic coupling sample transfer rod (MTA35 series), circular sample transfer robot arm, etc.
|
| TH600 | Dual-axis ultra-high vacuum sample transfer rod, manipulator series, etc. |
In addition to the Flag Type Sample Holder, Fermi Instruments also provides a variety of other sample stage transfer and storage solutions of different sizes and uses. If you need them, please contact info@fermi.com.

 中文
中文 021-6525 3206
 Your current location:

